
So, Spelunky is great. Come on, you know this. If you don’t, go play it. It’s available on just about everything that doesn’t say “Nintendo” on it.
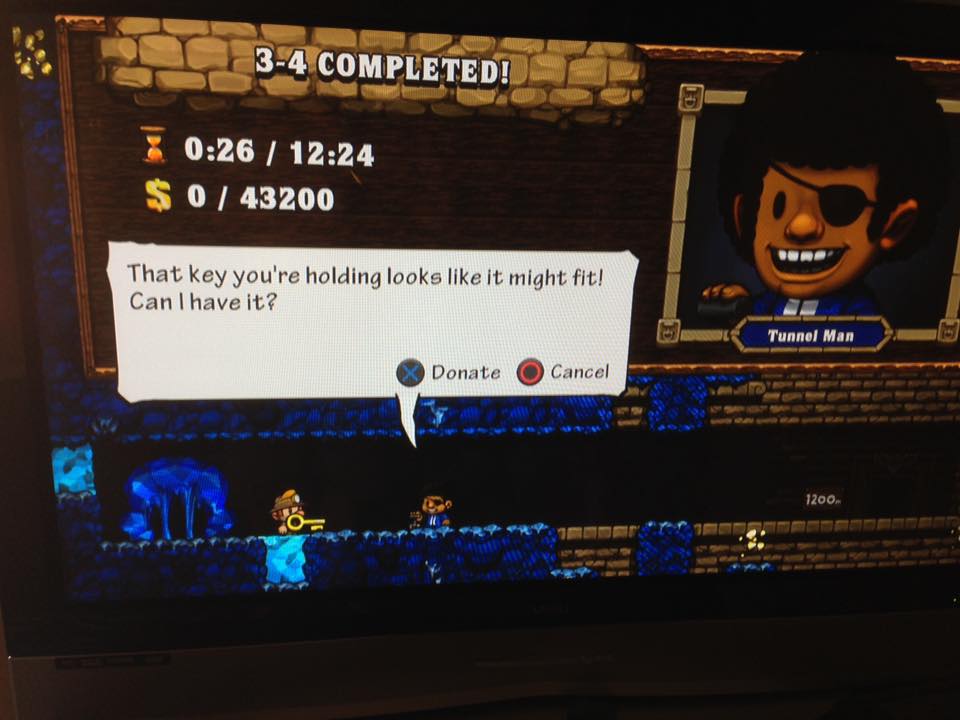
But only recently did I finally unlock the last shortcut in the game…the one that requires you to bring a golden key all the way from the Mines to the end of the Ice Caves. It’s a difficult task, because while you are holding the key you can’t hold anything else, or attack with your whip, and if you drop it into a spike pit or something…well, you need to start all over again.
To layer that challenge on top of Spelunky‘s already steep difficulty and randomly generated levels…and your own character’s comical fragility…well, let’s just say that it took me sporadic play over the course of several years to accomplish this.
Do I suck? Sure I suck! I suck less than I used to, but Spelunky is a game that continues to challenge even the best players, as its procedural generation algorithm requires every player to find a brand new strategy every time.
So, yeah, I suck. I’ll always suck. So will almost everybody who plays it.
That’s why I’m writing this guide for anyone who has as much trouble getting that key to the Tunnel Man as I did. I’ve never written something like this before, but when I looked for a resource that would help, I couldn’t find one. Mainly it was just people saying, “Keep trying.” Or “Just focus on getting better at the game.” And that’s good advice, but it’s not enough advice.
There’s a lot you can do, and be aware of, that will help you carry that damned key from the beginning of world one to the end of world three. And I’m going to provide actual, real, genuine, usable, helpful advice here, instead of the vague platitudes I usually see.
Transporting the key is hard. It always will be. When somebody asks for help, it’s because they already know that. “Get better” is meaningless to them.
So here are a few things they can do to make it easier.
Getting the Golden Key to the Tunnel Man
Exploit that First Room!
The first room is crucial for this run, as the key will never spawn here. That means that — mercy of mercies — you can play the game normally! So, y’know. Do that.
Explore 1-1 thoroughly. Grab every gem and bar of gold you find. Take it slowly and carefully. Eliminate enemies so they won’t trap you or surprise you later. Rescue the damsel for a (more or less) free hit point. You won’t need much money in this run, but having it helps, and this is the only guaranteed safe time to gather it. Don’t use bombs and ropes to get to inaccessible areas, though…not even for a damsel. You’ll need those tools later.
From rooms 1-2 through 1-4, the key can spawn. If it doesn’t spawn in 1-2, treat that room the same way. Explore it thoroughly, gather everything you can, save the damsel, and don’t use up your bombs and ropes. If it doesn’t spawn in 1-3, do the same thing there.
Once the key does spawn, wherever that is, your strategy needs to change immediately. Use however many rooms until that point to rack up your money and scratch your explorational itch. Once you have the key, though, you need to be all business.
Remember Your Mission…
This is important, and it’s difficult at first to remember. Long before you’re asked for the key, you “learn” to prioritize certain things. Gem collection, fighting monsters, rescuing damsels, and so on. But when you’re bringing the key to the Tunnel Man, that’s all you’re doing. Every other objective should be pushed out of your mind.
Don’t worry about anything else. Let huge caches of gems go uncollected. Let the damsel scream for help. Leave that giant spider alone. Do nothing aside from finding the exit in each stage. You never know when something that looks ripe for the picking turns out to have a spider dangling over it or a spike pit beneath it. All it takes is one unfortunate jump or misstep to end your run, so ignore everything that isn’t an immediate threat.
Also, if it’s not obvious, don’t go looking for the Haunted Mansion or the Black Market or the Mothership or any of those other secret areas. Worry about them later. Never, ever worry about them at the same time as the key.
…Except When These Things Happen
Sometimes it will be worth deviating from that rule, though. This is where risk management comes in, and as any Spelunky player knows, risks often refuse to be managed. That’s why you need to make sure every risk you take, no matter how small it seems, is worth it.
In other words, assume everything you do will go wrong and kill you. Is that gold bar worth grabbing under that assumption? Of course not. Is that compass? Maybe…because if by some quirk you do survive, you’ll be much better equipped to finish the mission.
So deviate when deviation increases your odds of delivering the key, but deviate only then. We’ll discuss which items are worth the risk next, so for now let’s focus on some other pickups.
Damsels can be worth the extra hit point when you see one in an easy to access location near the exit. Since you can’t carry both a key and a damsel, it’s not worth taking one to the exit and then backtracking for the other unless you can do it quickly and without incident.
If you can’t, don’t bother. You’re weak, and it’s not worth risking health for the chance at another hit point…nor is it worth losing the key for good.
Money shouldn’t be gone out of the way for. You’ll earn enough just walking from the entrance to the exit, since we won’t be buying much in this run anyway. The same goes for chests. If you encounter them on your path, grab them. If you don’t, don’t.
Crates may be worth the effort, as you’re guaranteed either some bombs, some ropes, or a utility. Unless reaching a crate requires you to navigate tricky enemies or use more than one bomb (assuming you can spare one in the first place) to reach it, in which case you should ignore it. But if you can get there safely (and get back out again) go for it.
Items Worth Grabbing
Shops will spawn at unpredictable intervals throughout the run, so if you see one, try your best to at least get a glimpse of what they’re selling.
The compass guides you to the exits, so that’s worth going out of your way for if you see one. It allows you to make a beeline that can complete the run in just a few minutes, it’ll keep you out of treacherous corners of the map that you don’t need to be in, and it will help you enormously in dark rooms. It’s the most valuable item you can find in this run, bar none.
The climbing gloves are also valuable. These will allow you to grab onto sheer vertical surfaces, increasing mobility and eliminating most fall damage. It also renders the ropes in many cases redundant, which is a good thing, as it’s one less item to worry about.
Capes and parachutes also help with fall damage, but for this run they’re a bit more limited in their utility.
Spiked shoes are handy for dispatching enemies, but not worth going out of your way for.
…and that pretty much covers it. Basically anything you can equip without having to hold (being as you can only hold the key) is fair game, but aside from the compass, and maybe the climbing gloves, nothing was especially helpful to me.
If you have money left over, buy any bombs that the shops have, and then any ropes. And ignore those beautiful weapons you wish you could carry; you’re stuck hauling the key.
The Key is Your Weapon. Be a Pacifist.
On the bright side, though, the key is a weapon! You can kill things with it pretty easily, it’s thrown just like a rock or pot would be, and you can pick it up again as many times as you like.
…in theory. It can also be crushed by falling stones or boulder traps. It can fall onto a bed of spikes. It can slip into piranha-infested waters. It can tumble into bottomless pits. So while you can fight with it, follow this advice instead: don’t.
Pressing up or down will allow you to see a bit of what awaits you in that direction, and that can help when deciding whether or not to toss the key at an enemy or an arrow trap, but whenever possible you should set the key down carefully and pick up something else to throw. (Obviously remember to pick up the key again before moving on, or you will say a very loud curseword.)
Don’t use the key as a weapon, as tempting as it is. Maybe this is a lesson everyone has to learn the hard way. Maybe you’ll do just fine with it until you’re in the last room of the Ice Caves and so confident slinging the key around that you sling it right off the bottom of the screen just before the exit. Maybe that’s the way you need to learn this one.
But if you’re willing to take a piece of advice from a stranger, take this: guard the key. Treat it as a fragile object, even though it’s not. Place it carefully, and never take more than a few steps away. It’s the one and only thing you need for this run, so treat it accordingly.
Embrace Ideal Circumstances
The random nature of Spelunky means you won’t ever play the same game twice. But it also means that some runs will be extraordinarily difficult, while others will be much easier.
I want to break down what an “easy run” (relatively speaking) looks like, because I think it’s important to be able to recognize one. When you see that you’ve been dealt a hand that gives you something of an edge, you’ll want to play more carefully, because you know that it could be a long time before you get as lucky again.
I won’t take into account enemy and trap placement, since there are too many variables there to even give an overview, and since you’ll know at a glance what looks good (few enemies and traps) and what looks bad (shitloads and fucktons of enemies and traps).
Good Circumstances:
– A first level that does not require ropes or bombs in order to explore the whole thing.
– Golden key does not spawn until level 1-4, giving you more time to collect money, items, and damsels.
– Shop spawns in the Mines, carrying a compass.
– Multiple levels spawn damsels near the exits.
– Kissing booths.
Bad circumstances:
– Levels with “trap rooms” that force you into using bombs or ropes to escape.
– Golden key spawns in 1-2, especially after a 1-1 that didn’t provide you with much money.
– Weapon shops spawn instead of item or clothing shops.
– Dark levels. (These can end a key run on their own, no matter how good you’re doing otherwise.)
– Shopkeeper gets angered by something you didn’t do.
Dark levels are the only variant levels that really affect things one way or the other. Snake, spider, and restless dead levels just require you to be aware of certain enemy types, and shouldn’t change your strategy at all. Rushing water levels just mean you should be even more careful about throwing your key around, but you shouldn’t be doing that anyway.
If you have a compass, dark levels are much easier. But no matter what, juggling the torch and the key is a nightmare. Run straight for the exit and hope for the best, knowing you probably won’t experience the best. And that that’s okay.
Take it Carefully
Don’t rush. You might see the exit, but do you see that boomerang guy waiting to whack you? You might see the key, but do you see that cobra spitting venom just offscreen? You might see that damsel, but do you see that you can’t get back out of her little alcove without using a rope that you may not be able to spare?
Always survey the area thoroughly, and don’t run headlong into what looks like a safe area unless you know it’s a safe area.
This is especially important in the Jungle, which is easily the most dangerous part of the run. It’s also why you’ll want to make sure you didn’t use up your bombs before this. If you see the exit directly below you, it may be worth blasting your way through rather than navigating a series of death traps or man-eating plants to get there.
Take every opportunity to examine your surroundings and figure out the safest way through. Don’t take unnecessary risks. And don’t even worry about the ghost. You’re moving toward the exit, remember, and the levels are small enough that she will never have time spawn if that’s all you’re looking for.
Don’t Miss the Key!
The key (and chest) will always spawn in either 1-2, 1-3, or 1-4. You don’t need to look for it in 1-1, but you do need to look for it after that. If you miss it, it’s gone forever, so be exhaustive in your search.
Won’t that use up bombs and ropes, though?
Fortunately, no. The way Spelunky works is that every level (though maybe not once you get to the Temple) is generated in a way that provides a direct path from the entrance to the exit…one that does not require bombs, ropes, or fall damage to reach. In other words, there’s a clear, relatively safe path through every level; you just need to find it.
In the level in which the golden key spawns, you will either see it, the golden chest, or both along that path. This is all the more reason not to bomb your way through levels yet; you’d miss the key you’d otherwise see if you took the clearer route.
In my experience the key and chest usually spawn close to each other, which makes them easy to find…but of course be careful not to accidentally touch the chest after picking up the key. (I’ve done that. It’s not fun.)
If you see the chest and not the key, you’ll absolutely have to make sure you find the latter before leaving. You may need to use bombs or ropes in order to do so. If you use too many of them, though, or take damage while you’re searching, you’ll be in trouble for the rest of the run.
So-ooo…
Don’t Be Afraid to Reset
Seriously. Don’t.
Better players of this game will read this advice and turn up their noses. Good. Fuck ’em. Because you’re not reading this to become a world champion Spelunky runner; you’re reading this because you just want to get the damned key to the damned Tunnel Man.
So don’t make it harder on yourself. Yes, ideally you’d be able to handle the entire run after having used all your bombs and taken a crapload of damage and encountered two dark rooms and angered the shopkeeper…
…but why do that? Recovering from those handicaps would be impressive, but focus on the goal at hand rather than some additional concept of what would an “impressive” run would look like. You can focus on those things — and should — after you deliver the key.
Until then, play it safe. Look for runs that hand you a compass and 20 bombs and four damsels. Reset ones that keep giving you teleporters and spectacles.
The random nature of Spelunky means that you could have many, many runs before you get the right mix of circumstances to push you across the finish line, so don’t be afraid to reset. If you reset the bad ones, you’ll have more time to focus on the ones that actually give you a shot at success.
If you used two bombs in level one, reset. If you didn’t save the damsel or took damage before finding the key, reset. If you’re at the end of the Mines and you don’t have enough of anything to make you feel confident about surviving the Jungle, reset.
It’s okay. Practice more, yes, because ideally you will be able to recover from setbacks like those, but remember: this isn’t about anything more than getting a key from point A to point B. The moment that no longer has a shot at happening, there’s no shame in going back to point A.
“Get better at the game” isn’t advice for getting the key to the Tunnel Man. So don’t feel as though you need to do both at the same time.
Good luck. And if you have any additional advice that’s worked for you, leave it in the comments.
Thank you so much this will hel[ me andmy son pass this fun but hard game. Gwhaaa!! your awesome thank you for giving such great advice and awesome strategy for us to use.
Honestly you should have way more comments on here this was the best read ever on the spelunky game if you have any others it would be helpful for us please write it thanks.
Thanks for the feedback! I love Spelunky, but so much of the coverage I found online was very in-depth and technical. They write for a very advanced level that doesn’t help me too much. I figured I couldn’t be alone, so I’d write something a little more superficial.
–
I don’t have any other Spelunky (or other game) guides yet, but I’d write more if there was interest. Let me know if there’s a topic you’d like me to cover and, if I can, I’ll be happy to.
–
Good luck!
Thanks great guide!
Getting the shotgun to the tunnel man was prob my greatest ever gaming achievement (I got lucky!). Doing this will be much harder!
You are mistaken about losing the key if it is dropped into a spike pit.
The key can be retrieved by slowly lowering yourself into the pit with the rope. This way, you can actually land on the spikes safely and walk around in them. Just don’t jump
I got the key to the end, and the tunnel man decided not to show up…
This was a really great guide. I got the game yesterday and when I got the point where he asked for a gold key, I was like “Wait, THAT gold key!?” I really love the circumstances you laid out to keep in mind, and how you made things simple and clear. If I wrote a guide I would want to write like you!
Me again, just finished taking the gold key down. I got lucky with a dark room in the mines not being too hard, which gave me a ton of scarab beetles, so I could buy a compass, but more importantly a jetpack! I must have been super lucky because it took me less than 5 tries, but I reset a few times too following your advice. I kind of can’t believe it haha.
You know, getting the Tunnel Man to ask for the key ONE DAY after buying the game is pretty impressive. It took me ages to get that far. I’m sure it took me a month or more to even make it out of the caves reliably!
–
Glad to hear you had such good luck. Fewer than 5 tries is very impressive. If I helped at all, I’m glad I did!
Dude, this was very well-written and very inspirational (for what it’s worth). It offers a great breakdown in strategy, and some really good metagame tips as well. I tip my hat to you for this.
What i just completed this on my first GO what i read some of this and nailed it installed the game this week only got 7h haha…
Hey thanks for this. I’ve picked the game back up after a few years away and i’m determined to finish it this time. Been struggling with the Temple a lot so i’m trying to get the shortcut to practice it more easily.
Cheers for this guide, if you can set it up right, I’d recommend trying to get Kapala (cup from Kali Altar after sacrificing 2 damsels worth which restores health as you collect blood droplets). Got to 3-3 with 7 health before falling like an idiot, although I was set up from there
Thanks mister. I have played this game an embarrassing number of times and didn’t think of it this way before. Off to the mines.
Thank you so much. I read your advice and I tried it. It only took me around 6 tries after that! I got an amazing run with a jetpack, spike boots and spring boots, climbing gloves, a compass, lots of bombs, and no dark levels!(and the key of course) then I got to the end of the ice caves and I was so happy! Thanks a bunch!
Well I got the key to the end in 20 minutes, lucky right? Nope. I had not thought about the fact that he might need the ropes and bombs first…
Hey man thanks for this guide, I’m in this quest now and I’ll be following all your advices. Regards from Argentina